So you’ve hopped on the Valheim hype train and are now in charge of surviving in a mysterious land. One thing you need for sure is a workbench to start crafting and upgrading.
Valheim is a survival RPG game, and you need to survive in an unknown environment that can be very punishing. I’ve compiled a kickstart Workbench guide that will start your journey in Valheim relatively quickly.
1. What’s a Workbench?
A Workbench in Valheim allows you to craft, repair, and upgrade new and more complex tools and items. A Workbench is one of the critical tools that you will be crafting when starting with Valheim.

That sounds good and all, but how exactly do you get on finding a Workbench in the mysterious desolate forest? Well, you build it, obviously!
2. How to Build a Workbench in Valheim?
To build a Workbench in Valheim, you need to gather ten pieces of wood and craft it by equipping your hammer and the build menu.
Before starting, you need to gather wood. Now if you don’t have a handy axe, it’s still possible. Just gather branches or punch smaller trees/bushes to gather their wood.

After collecting the wood, equip your hammer and right-click to access the build menu. The Workbench will be under the crafting section.

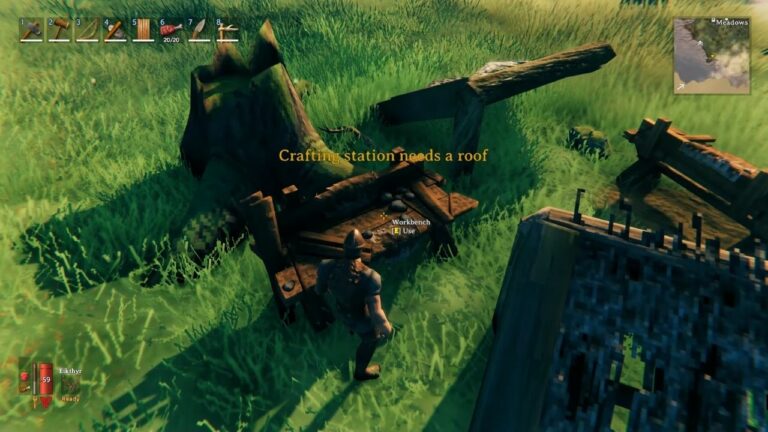
If you’ve just built your workbench and it’s just sitting there under the sky, you will be getting a message that it’s currently unavailable!
3. How to Build a Roof for the Workbench?
In Valheim, you cannot use the Workbench until it is protected from the surrounding environment by some wooden walls and a roof. Gather some more wood and construct an enclosure around it to use the Workbench.
The most basic setting for the enclosure would be to use three wooden walls and just install a roof over them, giving you access to the workbench and saving it from the surrounding elements.

A word of caution. If strong winds are coming towards the open side of your enclosure and into your Workbench, then too, the it will be unavailable. Install some roof tiles to extend your roof downward and get that protection from the strong winds! A better option would be to have the Workbench inside your resting house.
4. Upgrading the Workbench in Valheim
As you progress through your survival journey, it’s time to upgrade the Workbench too! Upgrading the Workbench is essential again if you want to craft higher-level tools and weapons.
To upgrade the Workbench in Valheim, you need to place specific items near it. The items that can upgrade a nearby Workbench will be marked with a golden star in the build menu’s crafting section.

Items that can upgrade your workbench:
- Chopping Block
- 10x Wood, 10x Flint
- Tanning Rack
- 10x Wood, 15x Flint, 20x Leather Scraps, 5x Deer Hide
- Adze
- 10x Fine Wood, 3x Bronze
- Tool Shelf
- 4x Iron, 1x Fine Wood, 4x Obsidian
Multiple items will not cascade the upgrade level so you only need one of each to upgrade the Workbench. You can get the items in any order as the upgrade path is not linear and any one of them will just increase the level of the Workbench by 1.
5. About Valheim
Developed by Iron Gate AB, Valheim is an online open-world Survival craft co-op game. Here, players will control dead Vikings and fight Odin’s ancient enemies and monsters.
In order to enter paradise, players will have to please Odin and prove their worth to the allfather.
The journey will not be easy as at every step, the danger of supernatural entities will loom. Players will have to venture out, explore various landforms, craft, and get stronger.



No Comments on Valheim: Guide to Build and Upgrade the Workbench